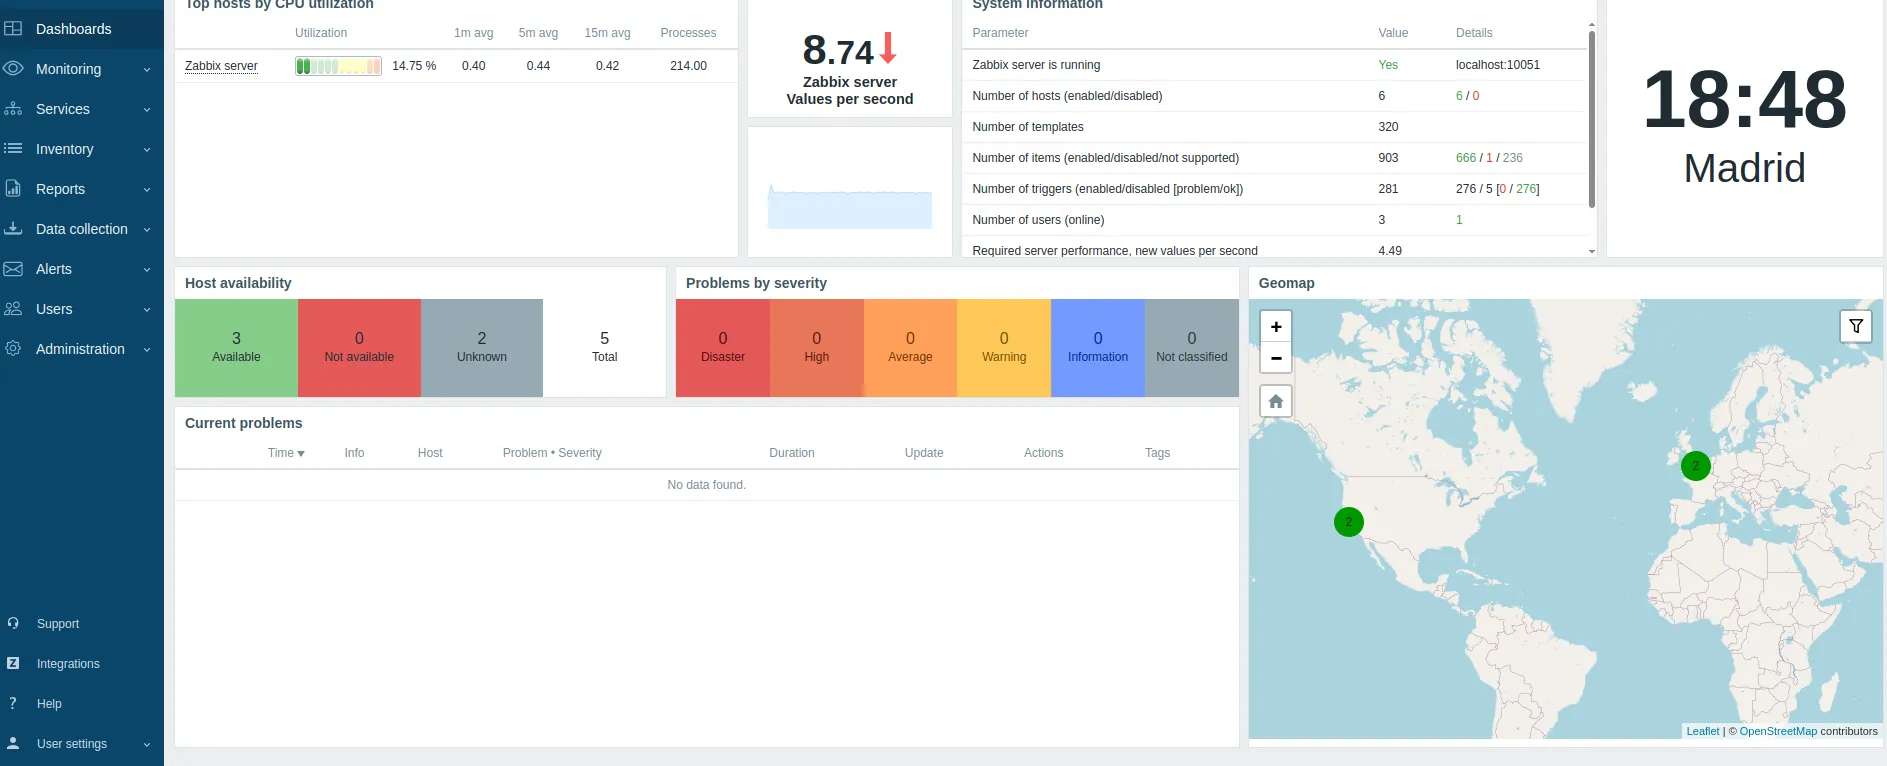
We only maintain the latest Zabbix LTS #
AWS Marketplace does not accept products that use an operating system or software that has reached end of life. Our Zabbix 4.2, 4.4, 6.0 and 6.4 AMIs do not meet that rule: they either run on Ubuntu 18.04 or 20.04, already out of standard support, or use a Zabbix version that is no longer maintained. AWS has withdrawn them and we cannot publish new versions of any of them.
That is why on Marketplace we only maintain the latest Zabbix LTS, currently 7.0, on Ubuntu 24.04.
We explain it in more detail on our blog.
If your setup needs to stay on an earlier Zabbix version, we can build a custom version for your AWS account, outside Marketplace. Contact support and we will look into it.
Imaxe.cloud has no partnership or agreement of any kind with Zabbix LLC. Please read the Relationship with Zabbix LLC section.
Description #
Zabbix is an open-source, enterprise-grade distributed monitoring solution that lets you monitor every parameter of a network of servers, virtual machines, applications and much more.
Our Zabbix AMI is the best click-and-play way to start using Zabbix on AWS, with extra options that improve on the original product, and first-class support.
Features #
General
The main features of our Zabbix AMI:
- Installed on Ubuntu, always on the latest stable release we can ship.
- Latest stable release of the Zabbix server installed.
- Latest stable release of the Zabbix web frontend installed and preconfigured.
- Tuned with the most stable releases of nginx, PHP, MariaDB server and Zabbix.
- Every web frontend language installed and available.
Special
Our AMIs add extra support so you can use the full power of the cloud in the fastest, most convenient way:
- Dedicated configuration for sending notifications through AWS SNS.
- Dedicated configuration for working with Auto Scaling groups.
- CloudFormation stacks that create every related resource (SNS, SQS, IAM and so on).
Available versions #
The Zabbix versions we ship, along with their main characteristics:
Earlier versions of the Zabbix AMI have been blocked by Zabbix LLC, who do not seem to want any kind of competition. The Imaxe.cloud product offers unique features that Zabbix itself does not have, so we believe this is a mistake and we are working to resolve it.
| AMI | Zabbix | Zabbix support | Imaxe support | SNS | Auto Scaling | Ubuntu | PHP | MariaDB | Marketplace |
|---|---|---|---|---|---|---|---|---|---|
| Zabbix 7.0 v1.1 | 7.0 | ✓ | ✓ | ✓ | ✓ | 24.04 | 8.3 | 10.11 | View → |
| Zabbix 6.4 v2.0 | 6.4 | ✗ | ✓ | ✓ | ✓ | 22.04 | 8.1 | 10.11 | Not available |
| Zabbix 6.0 v1.1 | 6.0 | ✓ | ✓ | ✓ | ✓ | 20.04 | 7.4 | 10.11 | Not available |
| Zabbix 4.4 v1.2 | 4.4 | ✗ | ✓ | ✓ | ✗ | 18.04 | 7.2 | 10.5 | Not available |
| Zabbix 4.2 v8.0 | 4.2 | ✗ | ✓ | ✓ | ✗ | 18.04 | 7.0 | 10.5 | Not available |
Lifecycle #
Zabbix has a fairly strict release policy: every few months the current stable version stops being supported, and you have to upgrade to the next major release — with everything that entails — to stay supported.
At Imaxe we understand that keeping up with such a strict lifecycle is sometimes very hard, so we designed a lifecycle policy for our AMIs that stays as close as possible to the Zabbix lifecycle while giving our users the best Zabbix support available.
Zabbix versions
Zabbix currently offers two different versions of its software:
- Standard version: includes the latest changes and features, but has no LTS support.
- LTS version: includes the latest changes and features at the time it is released, and comes with LTS support.
Support for non-LTS Standard versions
So that new customers can evaluate the advantages they will soon get in their LTS versions, we always keep an AMI of the latest Standard release running, with all the extra features working.
The AMI version number goes up as new releases appear, and the Zabbix version number changes when that goes up too.
Support for LTS versions
We keep the AMIs built from LTS versions alive for as long as possible, updating both the operating system and the extra features every 3 months.
Once keeping an AMI active is no longer viable for technical or security reasons, it is disabled and every user receives a notice from AWS pointing them at the version that best suits them.
We also support migration between versions whenever that is possible.
Installation #
Installation follows the normal process of creating an EC2 instance. The recommended size is c5.large.
The security group usually includes the following rules:
| Type | Protocol | Port range | Source |
|---|---|---|---|
| (*) SSH | TCP | 22 | 0.0.0.0/0 |
| (*) HTTP | HTTP | 80 | 0.0.0.0/0 |
| (*) Custom TCP rule | TCP | 10050–10052 | 0.0.0.0/0 |
| HTTPS | HTTPS | 443 | 0.0.0.0/0 |
The rules marked with (*) are essential, either to reach the web interface or for normal server operation. Although the example uses 0.0.0.0/0, we recommend restricting access to your own networks or a bastion host.
Once the instance is running, you can log in with:
- SSH: using the
.pemkey you selected when launching the instance, with theubuntuuser. - HTTP: at
http://zabbix.instance.ip/, with userAdminand, as the password, the ID of the instance you have just created.
Configuration #
The steps below are done with the Admin user, because that is the default one.
The first time you log into Zabbix there are a few tasks to personalise your experience and start receiving notifications. Click User settings in the left-hand menu, then Profile.
Add a media type for your user
Before you can receive notifications you need to add an email address (or any other method you prefer) to your user. On the profile page there is a Media tab; click the Add link there to open the configuration dialog. Don’t forget to press Update afterwards so the changes are saved.
Change the Admin password
By default the Zabbix AMI uses the instance ID as the password. That is a secure way to protect access, but you will probably want something easier to remember or something that matches your security policy.
On the Profile page, in the User tab, you can change the Admin password by clicking Change password, typing your new password twice and pressing Update.
Change your language
On the profile page, in the User tab, you can pick the language for the user interface from the Language selector. The change takes effect once you choose a new language, save with Update and log in again.
Auto Scaling support # expert
How does AWS Auto Scaling work with Zabbix?
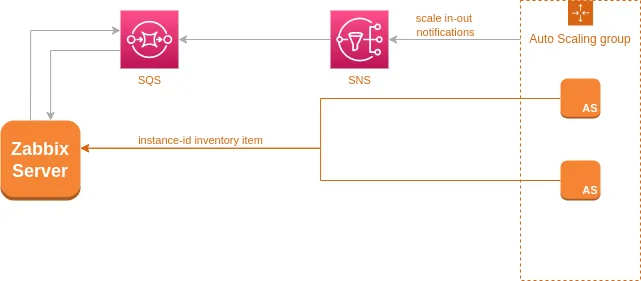
To handle Auto Scaling from Zabbix there are three separate things to take care of:
- Add a new instance to Zabbix when it appears. This can be done with active Zabbix agent auto-registration (6.4, 6.0, 4.0). That way, when a new instance appears, Zabbix adds it automatically as a new host.
- Store the instance ID in the Zabbix inventory. When the instance goes away (scale in) we receive a message with its ID, so we need that ID in the host inventory to look it up and delete it.
- Receive the AWS scaling messages. When AWS produces a scaling event it publishes an SNS message to a topic you define. By connecting that topic to an SQS queue we can read the messages from Zabbix and remove the instances that leave the scaling groups.
Configure the client
Two steps are needed to prepare your clients for Auto Scaling in Zabbix: configure the Zabbix agent, and add a file with a user parameter for the instance_id item.
Zabbix agent configuration
Alongside any other change you may need, six settings have to change in your Zabbix agent’s local configuration file, normally at /etc/zabbix/zabbix_agentd.conf:
- Comment out the
Serveroption. - Add
ServerActive=YOUR__ZABBIX__IP__ADDRESSto configure the active server. - Comment out the
Hostnameoption. - Set
StartAgentsto0. - Set
HostnameItemtosystem.hostname. - Set
HostMetadataItemtosystem.uname.
This puts the Zabbix client in active mode (the client pushes information to the server instead of receiving checks from it). It also makes Zabbix use the machine name as the host name, so you don’t have to change it every time a new server boots. Finally, it makes Zabbix send the output of uname as host metadata: AWS instances use a special kernel, so the value aws shows up there and we can use it to register the server.
The instance_id parameter
By default, when a new Auto Scaling server appears in Zabbix it is linked to a special template called AWS EC2 Template, which has an item named instance_id bound to the inventory alias field. To feed it, add a user parameter to your Zabbix client by creating this file:
UserParameter=aws.ec2.instance_id,curl -s http://169.254.169.254/latest/meta-data/instance-idConfigure the server
With the clients configured, the next step is configuring the server to delete removed instances. The fastest and simplest route has two steps: send the scaling messages to an SQS queue, and configure the server to read it.
Send the scaling messages to an SQS queue
We want the notifications sent by the Auto Scaling service stored in an SQS queue, for durability and scale. Since AWS Auto Scaling publishes notifications to an SNS topic, we need to:
- Create an SNS topic.
- Create an SQS queue.
- Configure SNS to deliver the messages to SQS.
- Create an IAM user that can read the messages.
Because that setup is fiddly, you can use our CloudFormation stack to create every element in the region you want. After deploying the stack, the Outputs tab gives you four values to write down:
SNSTopicARN: the ARN of the SNS topic created.SQSQueueURL: the URL of the SQS queue.SQSReadIAMUserAccessKeyandSQSReadIAMUserSecretKey: the IAM user’s key and secret.
You need those values for the configuration. Edit /etc/zabbix/zabbix_ami.yml, in the block that looks like this:
sqs:
  delay_seconds: 60
  default_region: us-east-1
  queues:
    - url:
      access_key_id:
      secret_access_key:
      region:
For every SQS queue with scaling notifications, add an array entry like the existing one with the values CloudFormation gave you. There is more about this file in the important files section.
SNS notifications #
This Zabbix installation is already prepared to send through AWS SNS. That setup avoids the problems of sending email from AWS and gives you an advanced, secure notification system.
Configure alert delivery with SNS
You can configure up to 6 different SNS topics, so you can tell messages apart by severity:
| Zabbix severity | Key in zabbix_ami.yml |
|---|---|
| Not classified | not_classified |
| Information | information |
| Warning | warning |
| Average | average |
| High | high |
| Disaster | disaster |
For Zabbix to send the notifications we need to create those topics and an IAM user that can connect and publish messages.
Create the SNS topics and the IAM user
This is far simpler with our CloudFormation stack for SNS topics and an IAM user, which is set up to create everything. After deploying the stack, the Outputs tab gives you the values to write down:
SNSNotClassified,SNSInformation,SNSWarning,SNSAverage,SNSHigh,SNSDisaster: the SNS topic for each severity.ZabbixSendingUserAccessKeyIdandZabbixSendingUserSecretAccessKey: the IAM user’s key and secret.
One or more of these values may be missing, depending on the options you chose when deploying the stack.
Configure /etc/zabbix/zabbix_ami.yml
Inside /etc/zabbix/zabbix_ami.yml there is a dedicated section for the SNS options:
sns:
  aws:
    access_key_id:
    secret_access_key:
    region:
  topics:
    not_classified: arn:aws:sns:eu-west-1:000000000000:sample-sns
    information:    arn:aws:sns:eu-west-1:000000000000:sample-sns
    warning:        arn:aws:sns:eu-west-1:000000000000:sample-sns
    average:        arn:aws:sns:eu-west-1:000000000000:sample-sns
    high:           arn:aws:sns:eu-west-1:000000000000:sample-sns
    disaster:       arn:aws:sns:eu-west-1:000000000000:sample-sns
Set the SNS topics you want (you can reuse the same topic several times if you prefer) plus the key, secret and region. That’s all!
Configure the Zabbix user
The last step is telling Zabbix to send notifications through SNS:
- Log into the Zabbix interface with your user.
- Go to User settings → Profile.
- Open the Media tab.
- Add a new media of type AWS SNS, mark it Enabled and fill in the rest of the fields as you like (the Send to field is currently unused, so anything goes).
- Press Add to add the media, then Update to save the changes.
CloudFormation #
Because creating all the required AWS resources is fiddly, here you can download different AWS CloudFormation stacks to make your work simpler.
SNS Topic + SQS Queue + IAM User
Creates an SNS topic to attach your scaling groups to, an SQS queue that receives its notifications, and an IAM user that can read and delete messages from the queue.
SNS Topics + IAM User
Creates up to 5 SNS topics for Zabbix to publish notifications to, and an IAM user that can publish them.
Important files # expert
The Zabbix AMI has a number of special files you should know about.
/etc/zabbix/zabbix_ami.yml
This is the most important one, because it drives the configuration of the special features, such as the scaling checks or the SNS notifications. Here is an example (with fake data):
zabbix:
  api:
    user: autoscaler_api_user
    password: i-073672daf01037aea94
sns:
  aws:
    access_key_id: AKK4L6A3OXZZ5HE2POQRU7V
    secret_access_key: cICycAg26hSDpsJwbhZjbaaYlt4Tz3n1xqE7Oxp6X2Hf
    region: us-east-1
  topics:
    not_classified: arn:aws:sns:us-east-1:000000000:Zabbix-General-SNS
    information:    arn:aws:sns:us-east-1:000000000:Zabbix-General-SNS
    warning:        arn:aws:sns:us-east-1:000000000:Zabbix-General-SNS
    average:        arn:aws:sns:us-east-1:000000000:Zabbix-General-SNS
    high:           arn:aws:sns:us-east-1:000000000:Zabbix-General-SNS
    disaster:       arn:aws:sns:us-east-1:000000000:Zabbix-General-SNS
sqs:
  delay_seconds: 60
  default_region: us-east-1
  queues:
    - url: https://sqs.us-east-1.amazonaws.com/000000000/zabbix-pro-sqs-queue
      access_key_id: AKIA3OXZZ5HEWUR5A16CNWH
      secret_access_key: 8ttYO3Ba9K6p0C+aj3fH5cDt2eRLHmlkHbMtlrpv18S7KRbC
      region: us-east-1
The file currently has three separate sections:
zabbix: since we need to talk to the Zabbix server to delete stale hosts, we need API access. We create a dedicated user for it, and its credentials go here.sns: the configuration required to send alarms through SNS. This is where the IAM user credentials and the SNS topics we use are set.sqs: the configuration that drives the AWS scaling messages. Here we define how often the queue is polled (delay_seconds) and the different queues to check.
It holds IAM credentials in plain text. Restrict its permissions and rotate the keys regularly.
/var/log/zabbix-sqs-reader/zabbix-sqs-reader.log
This file records the Auto Scaling events read from SQS.
Before you configure anything you will see the message Ops! It looks like the file /etc/zabbix/zabbix_ami.yml hasn't been configured yet. We better sleep for 5 minutes. — that is normal, and it goes away once you configure zabbix_ami.yml.
AMI updates # expert
Read the whole section before doing anything, and take a backup of all your data.
Since Zabbix ships new releases with new features and improvements, the best approach is to update your Zabbix AMI from time to time. Unfortunately, those same features involve database and internal changes that can be painful when upgrading an existing installation.
Our Zabbix AMI is the best way to avoid those problems, because we offer a path between major versions that is faster, simpler and safer than the usual one.
Update at a glance
The update process for our AMI is fairly simple, and boils down to:
- Dump your current database.
- Launch a new AMI on the latest stable release.
- Upload the database dump to the new instance.
- Run our migration script.
This way you keep the current and the new version running at the same time, and you can test as much as you need to be sure everything works before moving the EIPs attached to that instance, or migrating clients gradually.
In this tutorial we use source for your current Zabbix server and target for the new one.
Update process
Step 1: back up the source server
The first step is taking an image of the source server, to avoid any accidental data loss. You can follow the AWS guide on creating an AMI.
Step 2: dump the database and note the Zabbix version
Log into the instance over SSH and become root:
sudo /bin/su -Then dump the database to a file:
mysqldump zabbix > zabbix_origin_database.sqlFinally, download that file to your machine so you can upload it to the new server. Note down the Zabbix version you are currently running too: you can see it in the web interface, and it should be a number like 4.0, 4.2, 4.4 or 5.4.
Step 3: launch a new Zabbix instance
Next, create a new Zabbix instance using the latest stable AMI release, which you can find on our AWS Marketplace seller profile. You need at least version 6.0 of our Zabbix AMI.
This new instance is the target server we will move the data to, and it already ships the latest version installed and updated. Once it is up, copy the source server’s database dump onto it.
Step 4: upgrade the database
To import your current database, upgrade it to the new version and add the required configuration, use the /opt/tools/bin/zabbix-ami-upgrade.sh script. Run it as the ubuntu user, passing the original Zabbix version and the dump file. For example, migrating from Zabbix 4.0:
/opt/tools/bin/zabbix-ami-upgrade.sh 4.0 zabbix_origin_database.sqlThe process reports each step it takes, and once it finishes you can carry on working with your new Zabbix server.
Step 5: open the web interface
Once the migration is done you can open the web interface and check the overall state of your server. Note that you must use the same users and passwords you had on the previous server.
Step 6: migrate special configuration and point your clients
With the database working, take into account any other configuration you may have installed on the server, such as:
- Monitoring scripts.
- Extra system packages.
- SSL certificates you installed.
You will also want to move the EIP you had attached to that instance, so your clients need no changes.
If you are not using an EIP, this is a good moment to start: otherwise you have to change the new server’s IP on every client.
Support #
Using this Zabbix AMI includes support for:
- AMI installation.
- Initial configuration.
- Additional AMI-related configuration (using Let’s Encrypt, for example).
- Zabbix configuration related to the AMI.
- Sending Zabbix notifications with SNS.
- Auto Scaling support in Zabbix.
- Our CloudFormation stacks.
- General Zabbix support.
- AMI updates, upgrades and migrations.
Changelog #
AMI history. Dates are the publication date of each version on AWS Marketplace.
Zabbix 7.0 · version 1.1
Version 1.1 of our Zabbix 7.0 AMI, with Zabbix installed and configured, Auto Scaling support and SNS notifications.
Zabbix 6.4 · version 1.0
Version 1.0 of our Zabbix 6.4 AMI, with Zabbix installed and configured, Auto Scaling support and SNS notifications.
Zabbix 6.0 · version 1.0
Version 1.0 of our Zabbix 6.0 LTS AMI, with Zabbix installed and configured, Auto Scaling support and SNS notifications.
Zabbix 5.4 · version 1.0
Version 1.0 of our Zabbix 5.4 AMI, with Zabbix installed and configured, Auto Scaling support and SNS notifications.
Relationship with Zabbix LLC #
Imaxe.cloud does not have, and has never had, any kind of agreement with Zabbix LLC, the company that maintains Zabbix.
The information and support offered here are provided unofficially, on top of the free software product Zabbix and the additional options we build around it.
Need help with this AMI?
You get an answer from the same team that builds the image — real engineers, no bots, no first-line triage.