Zabbix AMI
Our Zabbix AMI has been enhanced with special options and optimized for the best performance.
Zabbix is an open source enterprise distributed monitoring solution, which allows you to monitor all parameters of a network of servers, virtual machines, application and much more.
Our Zabbix AMI offers the best click & play solution to start using Zabbix on AWS, with additional options that enhance the original product, and the best support.
Features
General
The main features of our Zabbix AMI are:
- Installed on Ubuntu, always on the latest possible stable version.
- Latest stable version of Zabbix server installed.
- Latest stable version of the Zabbix web interface installed and preconfigured.
- Optimized with the most stable versions of nginx, PHP, mariadb server and zabbix.
- All web interface languages are installed and available.
Special
Our AMIs offer additional support to be able to use the full power of the cloud in the fastest and most convenient way:
- Special configuration for sending notifications using AWS SNS.
- Special configuration for working with autoscaling groups.
- CloudFormation Stack to create all related resources (SNS, IAM, etc).
Available versions
The following versions of Zabbix, as well as their main features, are shown below:
| AMI | Zabbix Version | Zabbix support | Imaxe support | SNS | Autoescalado | Ubuntu | PHP | Mariadb | Link |
|---|---|---|---|---|---|---|---|---|---|
| Zabbix 4.2 v8.0 | 4.2 | ❌ | ✅ | ✅ | ❌ | 18.04 | 7.0 | 10.5 | Link |
| Zabbix 4.4 v1.2 | 4.4 | ❌ | ✅ | ✅ | ❌ | 18.04 | 7.2 | 10.5 | Link |
| Zabbix 6.0 v1.1 | 6.0 | ✅ | ✅ | ✅ | ✅ | 20.04 | 7.4 | 10.11 | Link |
| Zabbix 6.4 v2.0 | 6.4 | ❌ | ✅ | ✅ | ✅ | 22.04 | 8.1 | 10.11 | Link |
Life cycle
Zabbix has a update policy quite strict, which leads to every few months to stop supporting the stable version of that moment, and it is necessary to update the major version (with the problems that that can imply) to continue having support.
On the part of Imaxe we understand that, sometimes, it is very difficult to be able to maintain that strict life cycle, so we have designed a life cycle policy for our AMIs that, maintaining as far as possible the compatibility with the life cycle of Zabbix, offers our users the best existing support for Zabbix.
Zabbix versions
Currently, Zabbix offers two different versions of its software:
- Standard version: Includes the latest changes and characteristics, but it has no LTS support
- LTS version: Includes the latest changes and characteristics at the time of appearing, and also has LTS support
Support to Standard No LTS versions
In order for new customers to assess the advantages that they can soon use in their LTS versions, we will always maintain an AMI of the latest operational standard version, and with all additional operational features.
The AMI version will increase as new versions appear, and also the Zabbix version number will change when it is also increased.
Support to LTS versions
While possible, the AMIs generated from LTS versions will be maintained, and will be updated, both at the level of operating system and additional features, every 3 months.
Once it is not viable by technical or security characteristics to be able to maintain an active AMI, it will be disabled, receiving all users a AWS notice, where the new most appropriate version for them will be indicated.
In addition, support will be offered to migration between versions whenever possible.
Facility
The installation follows the normal process of creating an instance in EC2. The recommended size is C5.Large.
The security group normally includes the following permits:
| Type | Protocol | Range of ports | Source |
|---|---|---|---|
| (*) SSH | TCP | 22 | 0.0.0.0/0 |
| (*) HTTP | HTTP | 80 | 0.0.0.0/0 |
| (*) Custom TCP rule TCP | TCP | 10050 – 10052 | 0.0.0.0/0 |
| HTTPS | HTTPS | 443 | 0.0.0.0/0 |
The fields marked with (*) are essential, either to access the web interface or for normal server operations. Although we use 0.0.0/0 here to allow access from any origin as an example, we recommend blocking access only to your networks or Bastion server.
Once the instance is working, we can access with:
- SSH: Using the .pem that we have selected when launching the instance, and the user ubuntu
- HTTP: Using the address http://zabbix.instance.ip/ , with user admin and password the ID of the instance we just created.
Configuration
The first time you access Zabbix there are several tasks to do to customize your experience and start receiving notifications. To do this, you must click on the menu option “User Settings” in the Menu of the Left, and then in “profile”.
Add a media for your user
Before receiving notifications you must add an email address (or other method you prefer) for your user. On the profile page you can see a tab called “Media”, in that tab you must click on the link “add” that opens a configuration window. Then do not forget to click on the “update” button so that the changes are stored.
Change the user key admin
By default, Zabbix’s AMI uses the instance ID as a password. This is a safe way to protect access, but surely you prefer to change it for some simpler to remember or comply with your security policy.
From the Profile page, on the “User” tab, you can change the admin user password in the “Change Password” button, putting your new password twice and pressing on the “update” button.
Change your language
From the profile page, in the “User” tab, you can select which language you want for the user interface from the selector “language”. The changes are effective once you choose a new language, Salves by clicking on the “update” button and log in.
Auto Scaling support
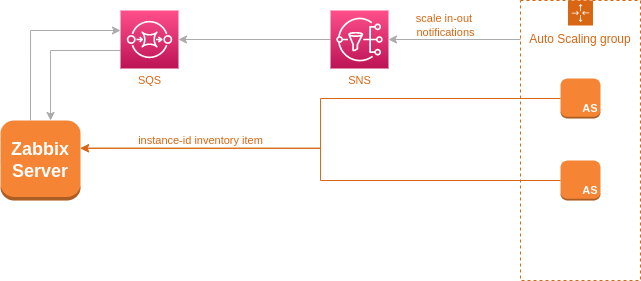
How does AWS auto scaling with Zabbix work?
To handle auto scaling from Zabbix we must take into account two different points.
1.Add a new instance in Zabbix when appears
This can be done using autoregistration of Active Zabbix agents version 6.4 , version 6.0 , version 4.0 . In this way, when a new instance appears, Zabbix automatically adds it as a new team.
2.Save the instance id in the inventory of Zabbix
When the instance disappears (Scale in), we will receive a message with the ID of that instance, so we have to have this ID associated in the inventory of the host in Zabbix to be able to look for it and erase it when it disappears.
3.Receive AWS scaling messages
When AWS produces a auto scaling event, it sends an SNS message to an SNS topic that we have defined. Connecting that SNS to a SQS queue we can read the messages from Zabbix and eliminate the instances that are removed from the auto scaling groups.
See this simple diagram of how it works:
Configure the client
Two steps are necessary to configure your zabbix clients to handle auto scaling in Zabbix:
- Configure Zabbix agent
- Add a file with a user parameter for the Instance_id element
Agent Zabbix configuration
We must change (in addition to any other change you may need) six points in the local configuration file of our Zabbix agent (usually located in /etc/zabbix/zabbix_agentd.conf):
- Comment on the Server option
- Add ServerActive=your__zabbix__ip__address to configure the active server
- Comment on the Hostname option
- Put the StartAgents to 0 option
- Put the HostnameItem option system.hostname
- Put the HostMetadataItem a system.uname
With this configuration, what we do is configure our Zabbix client as an asset (the client sends information to the server, and does not receive check). In addition, we define that Zabbix uses the name of the machine as equipment name, so we avoid having to change it every time a new server starts, and simplify the scaling configuration. Finally, we define that Zabbix sends the value of the “uname” command to define the information of this team that we send to the Zabbix server. As the instances on AWS use a special kernel, the “AWS” value appears in it and we can use it to register the server.
Instance_id parameter
By default, when a new server from a car appelled in Zabbix, it linked with a special tempate called AWS EC2 Template, which contains an element called Instance_ID associated with the “alias” element of the inventory. For this we need to add a user parameter in our Zabbix client to send the value of this element.
We can do this creating a file in /etc/zabbix/zabbix_agentd.d/template_aws_ec2.conf that contains:
UserParameter=aws.ec2.instance_id,curl -s http://169.254.169.254/latest/meta-data/instance-idConfigure the server
Once we have already configured our customers, the next step is to configure the server to erase the eliminated instances. To do this, the fastest and simplest way consists of two steps:
- Send the scaling messages to a SQS queue
- Configure the server to read the SQS queue
Send the scaling messages to a SQS queue
We need the notifications sent by the Auto Scaling service to be stored in a SQS queue to guarantee durability and scale. As AWS automatic climbing sends notifications to an SNS topic, we need:
- Create an SNS topic
- Create a SQS queue
- Configure SNS to send messages to SQS
- Create an IAM user who can read the messages.
As this type of configuration is complicated, you can use our cloudformation stack to create all the elements in the region you want. After displaying the Stack, on the Outputs tab you will find four values that you should write down:
- SNSTopicARN: The ARN of the SNS topic created
- SQSQueueURL: The URL of the SQS queue
- SQSReadIAMUserAccessKey and SQSReadIAMUserSecretKey: the user and key of the iam user
You need that data for configuration. To do this, edit the file /etc/zabbix/zabbix_ami.yml, in the code similar to:
sqs:
  delay_seconds: 60
  default_region: us-east-1
  queues:
  - url:
    access_key_id:
    secret_access_key:
    region:
For each SQS with auto scaling notifications, we will need to add an array of elements similar to the one that exists, with the data indicated by cloudformation.
You have more information about this configuration file in the AMI configuration file section.
Notifications SNS
This Zabbix installation is already prepared to send with AWS SNS. This type of configuration allows us to avoid problems by sending emails from AWS and offers us an advanced and safe system to send notifications.
Configure alert notifications with SNS
We can configure up to 6 different SNS topics (to distinguish depending on the importance of notifications), which are:
- Not classified
- Information
- Warning
- Average
- High
- Disaster
For Zabbix to send the notifications we must create these topics and an IAM user that can connect and send messages.
Create the SNS topics and the IAM user to send messages
This step is simpler with our Cloudformation Stack to create SNS Topic and IAM User that is already prepared to create everything.
After displaying the stack, you will find on the Outputs tab the values you have to write down:
- SNSAverage: SNS topic for Average type problems
- SNSDisaster: SNS topic for disaster problems
- SNSHigh: SNS topic for High problems
- SNSInformation: SNS topic for information type problems
- SNSNotClassified: SNS topic for classified problems
- SNSWarning: SNS topic for warning problems
- ZabbixSendingUserAccessKeyId and ZabbixSendingUserSecretAccessKey: IAM user and Password
Note: One or more of these values may not appear depending on the configuration you have created when displaying the stack.
Configure /etc/zabbix/zabbix_ami.yml
Within the file /etc/zabbix/zabbix_ami.YML you will find a specific section to configure the SNS options. The relevant code is shown here:
sns:
  aws:
    access_key_id:
    secret_access_key:
    region:
  topics:
    not_classified: arn:aws:sns:eu-west-1:000000000000:sample-sns
    information: arn:aws:sns:eu-west-1:000000000000:sample-sns
    warning: arn:aws:sns:eu-west-1:000000000000:sample-sns
    average: arn:aws:sns:eu-west-1:000000000000:sample-sns # Average
    high: arn:aws:sns:eu-west-1:000000000000:sample-sns # High
    disaster: arn:aws:sns:eu-west-1:000000000000:sample-sns # Disaster
You need to configure the desired SNS topics (you can rehuse the same topic several times if you prefer) and the user, password and region values. This is all!
Set the Zabbix user
The last step is to configure Zabbix to send notifications from SNS. For this we will need:
- Enter the Zabbix interface with user data
- Go to User Settings => Profile
- Press on the Media tab
- Add a new “AWS SNS” type medium, enabled, and configure the rest of the fields as you prefer (the field Send to is not currently used and you can put what you want in it)
- Press on the ADD button to add the new medium, and then in update to save the changes.
That’s all!
Cloudformation
As it is difficult to create all the necessary AWS resources, here you can download different aws cloudformation to do your simplest job.
SNS Topic, SQS Queue and IAM User
This AWS cloudformation template creates the following elements:
- SNS topic to associate autoscaling groups
- Sqs queue to receive SNS notifications
- IAM User to read and delete messages from the SQS queue
You can download this template or open it directly in cloudformation .
SNS Topic and IAM User
This AWS cloudation template creates the following elements:
- UP to 5 SNS Topics For Zabbix to send notifications
- IAM User That can send SNS messages
You can download this template or open it directly in cloudformation .
Important files
Zabbix’s AMI contains a number of special files that you should know
/etc/zabbix/zabbix_ami.yml
This is the most important file, because it manages the configuration of special aspects such as auto scaling checks or SNS notifications. An example of this file (with false data):
zabbix:
  api:
    user: autoscaler_api_user
    password: i-073672daf01037aea94
sns:
  aws:
    access_key_id: AKK4L6A3OXZZ5HE2POQRU7V
    secret_access_key: cICycAg26hSDpsJwbhZjbaaYlt4Tz3n1xqE7Oxp6X2Hf
    region: us-east-1
  topics:
    not_classified: arn:aws:sns:us-east-1:000000000:Zabbix-General-SNS # Not classified
    information: arn:aws:sns:us-east-1:000000000:Zabbix-General-SNS # Information
    warning: arn:aws:sns:us-east-1:000000000:Zabbix-General-SNS # Warning
    average: arn:aws:sns:us-east-1:000000000:Zabbix-General-SNS # Average
    high: arn:aws:sns:us-east-1:000000000:Zabbix-General-SNS # High
    disaster: arn:aws:sns:us-east-1:000000000:Zabbix-General-SNS # Disaster
sqs:
  delay_seconds: 60
  default_region: us-east-1
  queues:
  - url: https://sqs.us-east-1.amazonaws.com/000000000/zabbix-pro-sqs-queue
    access_key_id: AKIA3OXZZ5HEWUR5A16CNWH
    secret_access_key: 8ttYO3Ba9K6p0C+aj3fH5cDt2eRLHmlkHbMtlrpv18S7KRbC
    region: us-east-1
Currently, this file contains three different sections:
- Zabbix: As we need to connect with the Zabbix server to erase old servers, we need to access the API. For that, we generate a specific user and their connection data are indicated here.
- SNS: This is the configuration required to send alarms using SNS. Here we configure the IAM user data and the SNS topics that we are going to use.
- SQS: This section contains the configuration to control climbing messages on AWS. Here we define every time check the SQS (delay_seconds) and the different tails to check.
/var/log/zabbix-sqs-reader/zabbix-sqs-reader.log
This file records the different auto scaling events read from SQS.
Before making the configuration, you will see the message Ops! It looks like the file /etc/zabbix/zabbix_ami.yml has’t been configure yet. We Better Sleep for 5 Minutes., It is normal and disappears when you configure the zabbix_ami.yml file.
AMI updates
As Zabbix launches new versions each time with new features and improvements, the best option is to update our Zabbix AMI every certain type. Unfortunately, the same new features and improvements include changes in the database and internal base that can be problematic to update its Zabbix installation.
Our Zabbix AMI is the best way to avoid these problems, since we offer a way to update between major versions, which is faster, simpler and safe than the usual ones.
Summary of the update
The update process for our AMI is quite simple, and is summarized in the following steps:
- Make a dump of our current database
- Sailing a new AMI with the latest stable version
- Upload the database overtur to the new instance
- Execute our migration script
In this way, we keep the current and new version at the same time, and we can do the necessary tests to ensure that everything works correctly, and then change the EIP associated with that instance, or migrate clients little by little
Update process
Step 1: origin server backup
The first step is to make an image of our origin server, to avoid any loss of accidental data. You can see the AWS manual to create an AMI .
Step 2: Database dump and Zabbix version
The second step is to make a dates of the Zabbix origin database. To do this, we entered SSH in our instance, and we put ourselves as root with the command:
sudo /bin/su -Then, we will turn the database to a file with the command:
mysqldump zabbix > zabbix_origin_database.sqlFinally, we will download the file created to our machine, and then upload it to the new server.
We must also write down the current version of Zabbix that we are using. We can see the version in the Zabbix web interface, and it must be a number similar to 4.0, 4.2, 4.4 or 5.4.
Step 3: launch a new Zabbix instance
The next step is to create a new instance of Zabbix, using the latest stable version of the AMI that you can find in our Aws Marketplace profile . At least, you must use version 6.0 of our Zabbix AMI.
This new instance will be the destination server where we will move our data, and that already comes with the latest installed and updated version.
Once the instance has begun, we must copy the dump of the server database origin to this new server.
Step 4: Update the database
To insert our current database, update it to the new version, and add the necessary settings, we must use the script located in /opt/tools/bin/zabbix-ami-upgrade.sh, which must be executed as Ubuntu user, and to which we must indicate the original Zabbix version, and the file with the dump of data.
For example, if we are migrating from Zabbix 4.0 and we have overturned the current database in Zabbix_origin_database.sql, we should execute:
/opt/tools/bin/zabbix-ami-upgrade.sh 4.0 zabbix_origin_database.sqlThe process will inform us of the steps it takes, and once end we can continue working with our new Zabbix server.
Step 5: Access the web interface
Once the migration is over, we can already access the web interface and see the general situation of our server. It is important to keep in mind that we must use the same users and passwords that we had on the previous server.
Step 6: migrate special settings and configure customers
Once our database is operational, we must take into account other types of configurations that we have been able to install on the server, such as:
- Monitoring scripts
- Additional system packages
- SSL certificates that we have installed
We will also have to move the EIP that we have configured for that instance, so that customers do not need to be modified.
If we are not using EIP, it is a good time to start doing it, since we must change the IP of the new server in customers.
Support
The use of this Zabbix AMI includes support related to:
- The installation of the AMI
- Initial configuration
- Additional configurations related to AMI (e.g. use Letsencrypt)
- Zabbix configuration related to AMI
- Zabbix notifications with SNS
- Zabbix self -escalation support
- Our cloudation stacks
- Zabbix general support
- Updates, improvements and migrations of AMI
In any case, if you have any questions, you can always contact us and we will try to help you.
Changelog
January 27, 2024
Version 1.0 of our Zabbix 6.4 AMI has been released. With Zabbix installed and configured, autoscaling support and SNS notifications
September 27, 2022
We publish version 1.0 of our Zabbix 6.0 AMI, that includes Zabbix installed and configured, autoscaling and SNS notifications support.
March 4, 2022
We publish version 1.0 of our Zabbix 5.4 AMI, that includes Zabbix installed and configured, autoscaling and SNS notifications support.
Relationship with Zabbix LLC
Imaxe.cloud has never available or has arranged any kind of agreement with the company that Zabbix, Zabbix LLC.
The information and support offered are made in an unofficial way, about the free Zabbix software product and the additional options offered.